Bear Paw Succulent Care

Bear Paw succulent care tips including water, light, soil, fertilizer, and pests!
Bear Paw Succulent Care
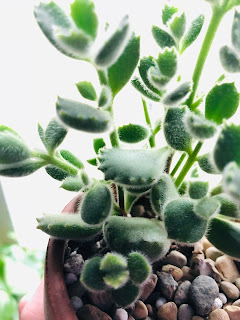
Bear Paw succulents are one of the cutest plants known for their resemblance to little paws! They are addictive to touch due to their softness. Bear Paw plants are easy to care for, but here are a couple of tips to help it thrive!

Water: Water Bear Paws about once a week in the summer, and water them once every other week in the winter. Bear Paws are drought tolerant so they are a perfect plant if you tend to forget to water. However, be careful not to overwater your Bear Paw because this can lead to root rot.

Light: Bear Paw needs bright light. The best place to grow them indoors is next to a sunny window. If your plant begins to lean towards the light, rotate it slightly every so often to keep it even.

Soil: Use a well-draining cactus and succulent mix.

Pot: Use a small terracotta pot with drainage. Terracotta pots can help prevent root rot since they allow the soil to breathe. Bear Paw succulents are slow-growing and have small root systems so they do not need a big pot. Potting your Bear Paw plant in too big of a pot can stunt its growth.

Fertilizer: Fertilize your Bear Paw once a year in the spring with a cactus and succulent slow-release fertilizer.


Pests: Bear Paw succulents are prone to mealybugs and spider mites. Although pests are not common on Bear Paws, they can kill your plant if they are not dealt with. Periodically check your plant for tiny, furry, white bugs, or webbing. These can be signs of an infestation. If you notice pests, deal with it immediately. What seems like a small problem at first can easily turn into a situation lethal to your plant.

To get rid of pests on your Bear Paw:

1. Isolate your plant from any other plants you may own.

2. Take a toothpick or Q-Tip and physically remove the pests.

3. Spray your plant with a solution of half water and half rubbing alcohol.

4. Repeat these steps once a week until the infestation is gone.

To prevent infestations on your Bear Paw plant, make sure to keep all of your plants healthy. Pests can easily spread from plant to plant.

Bear Paw succulent care tips including water, light, soil, fertilizer, and pests!
Bear Paw Succulent
Bear Paw succulent care tips including water, light, soil, fertilizer, and pests!
Green Bear Paw Succulent


Bear Paw succulents are easy to care for and give a unique look to any plant collection!

Good Luck!

Lily's Indoor Jungle

Indoor Elm Tree Care

How to care for an elm tree as a houseplant including tips on water, light, soil, pot, fertilizer, propagation, pests, and more!
Indoor Elm Tree
Elm Trees can be grown indoors as a bonsai, or just as a regular tree. Whether you trim your elm tree to keep it small or let it grow as big as it can, elm trees are an excellent choice for a houseplant! This guide will give an overview of how to grow an elm tree as a houseplant.

Water: Water your elm tree frequently to avoid letting the soil dry out. Elm trees like to stay moderately moist. Watering every 2-3 days is optimal. Too much water can lead to root rot, but not enough water will lead to your leaves dropping off.

Light: Elm trees can be grown in full sun to partial shade. It is best to keep it 2-3 feet from a window.

Soil: Elm trees do not need any specialty soil to grow well. A general all-purpose potting mix will work fine.
How to care for an elm tree as a houseplant including tips on water, light, soil, pot, fertilizer, propagation, pests, and more!
Elm Tree Leaves

Fertilizer: Elm trees should be fertilized in the spring at the beginning of their growing season. An all-purpose houseplant fertilizer will work fine.

Propagation: Elm trees can be propagated by cuttings. Take a 6-inch cutting from an unnoticeable area on your tree and stick it into dirt. For more information on how to propagate cuttings successfully, read my post on How to Propagate Plants from Cuttings.

Pot: If you are aiming to make your elm tree a bonsai, you will need a bonsai pot. Note that if you use a bonsai pot, you will have to trim the roots when you repot your tree. Otherwise, if you are looking to just let your elm tree grow, a regular terracotta or ceramic pot will work. Repot about every two years, or when the roots start to outgrow the pot.

Pests: When grown indoors, elm trees are susceptible to spider mites. To avoid spider mites, keep your elm tree well-watered, and keep the humidity around your plant high. Check for spider mites by misting your plant with water to check for webs. A warning sign for spider mites is yellowing and dropping of leaves. If you see spider mites, be careful treating your elm trees. The leaves are fragile against chemicals.

How to care for an elm tree as a houseplant including tips on water, light, soil, pot, fertilizer, propagation, pests, and more!
Elm Tree
To treat your elm tree for spider mites:

1. Separate your tree from the rest of your plants.

2. Spray your plant down with water to remove the spider mites. Cover the soil when you do this so you do not wash the spider mites into the soil.

3. Spray your plant with a mixture of half rubbing alcohol and half water.

4. Repeat twice a week.

Since elm tree leaves are sensitive, do not use any oil-based solutions because this will lead to leaf burn. Since you can not use neem oil or any other horticultural oil to help get rid of spider mites, it may take longer than usual to rid your plant of the pests. Be persistent and they will eventually go away.

Issues: Browning leaves can be a sign of too much or too little water. Monitor your soil to make sure it does not dry out or stay sopping wet for too long. Dropping leaves can also be a sign of too little or too much water; however, this can also be a sign of pests. Monitor your plant to prevent infestations.

How to care for an elm tree as a houseplant including tips on water, light, soil, pot, fertilizer, propagation, pests, and more!
Elm Tree Houseplant

Whether you chose to trim your elm tree to make it a bonsai or just let it grow, they are a beautiful plant to add to your indoor collection!

Good Luck!

Lily's Indoor Jungle

Kombucha Jar Gardens

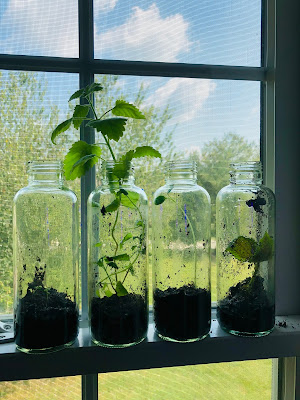
A great way to reuse your old kombucha jars is to make a garden with them! You can plant seeds, cuttings, and rooted plants into kombucha jars.

How to reuse old kombucha jars to plant seed, cuttings, and plants!
Kombucha Jar Garden


To Prepare your Kombucha Jars:

1. Wash the jar completely so there is no kombucha left.

2. Rinse and dry your jar completely.

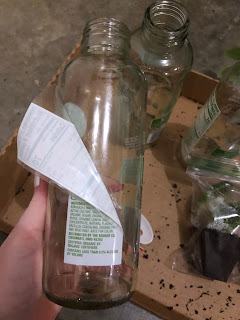
3. Remove the outside label.

4. If there is a sticky residue left on the jar, use rubbing alcohol to wipe it off.

How to reuse old kombucha jars to plant seed, cuttings, and plants!
Clean kombucha jar
How to reuse old kombucha jars to plant seed, cuttings, and plants!
Carefully peel off the label
How to reuse old kombucha jars to plant seed, cuttings, and plants!
Wipe off any excess residue
 To Plant Seeds:

1. Take your clean kombucha jar and fill the bottom with about 1 1/2 inches of dirt.

2. Take one seed and drop it into the middle of the jar.

3. If the seed does not land where you want it to, gently shake the jar.

4. Cover the seed with dirt.

TIP: An easy way to get dirt into the jar is to use a spoon. A long chopstick can help you move around the dirt and seed also!

How to reuse old kombucha jars to plant seed, cuttings, and plants!
Scoop dirt into the jar
How to reuse old kombucha jars to plant seed, cuttings, and plants!
I'm using Lunaria seeds, but you can use
whatever kind you like!
How to reuse old kombucha jars to plant seed, cuttings, and plants!
Shake the seed into the center of the jar
How to reuse old kombucha jars to plant seed, cuttings, and plants!
Cover with dirt

 For Plants with Roots:

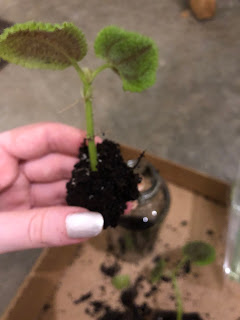
1. Take you clean kombucha jar and fill it with about 1/2 inch of dirt. This will depend on how big your plant already is. If you have a bigger plant, give it up to 2 inches of dirt to allow room for roots.

2. Remove your plant from its current container.

3. Carefully shake off most of the dirt from the roots. This will make it easier to get your plant through the tiny jar opening.

4. Lower your plant carefully into the center of the kombucha jar.

5. Add dirt with a spoon around the plant.

6. If needed, carefully shake the jar to position the plant and the dirt.

How to reuse old kombucha jars to plant seed, cuttings, and plants!
Add 1/2 inch of dirt
How to reuse old kombucha jars to plant seed, cuttings, and plants!
Chose a plant that is already rooted
How to reuse old kombucha jars to plant seed, cuttings, and plants!
Remove the plant from its container
How to reuse old kombucha jars to plant seed, cuttings, and plants!
Remove dirt around roots
How to reuse old kombucha jars to plant seed, cuttings, and plants!
Gently lower the plant into the jar
How to reuse old kombucha jars to plant seed, cuttings, and plants!
Add dirt around the plant to cover the roots


 For Cuttings:

1. Take a clean kombucha jar and fill the bottom with 1 1/2 inches of dirt.

2. Take a cutting with or without roots and gently lower it into the jar.

3. Shake the jar until the cutting is in the spot you want it to be in.

4. Add more dirt around the cutting until it is securely placed.

How to reuse old kombucha jars to plant seed, cuttings, and plants!
Use 1 1/2 inches of dirt
How to reuse old kombucha jars to plant seed, cuttings, and plants!
Chose a cutting. It can be with or without
roots.
How to reuse old kombucha jars to plant seed, cuttings, and plants!
Remove cutting from its container
How to reuse old kombucha jars to plant seed, cuttings, and plants!
Gently lower cutting into your container
How to reuse old kombucha jars to plant seed, cuttings, and plants!
Add dirt around the cutting
Other Tips:

To remove dirt from the side of the jar, gently scrape it off with a chopstick or water down the side of the jar.

How to reuse old kombucha jars to plant seed, cuttings, and plants!
Water down the side of the jar to remove dirt


 Place your jars under a grow light to help seeds sprout!

How to reuse old kombucha jars to plant seed, cuttings, and plants!
Grow lights can help seeds sprout successfully

 A great container to start seeds in is old plastic cups! This will save you from having to buy any expensive seed starting container. Just poke a hole in the bottom of the cup for drainage, and you can reuse them over and over!


How to reuse old kombucha jars to plant seed, cuttings, and plants!
Hole in bottom of plastic cup for
seed starting!


I hope you find this helpful! Plants are a great way to reuse old bottles!


How to reuse old kombucha jars to plant seed, cuttings, and plants!

Good Luck!

Lily's Indoor Jungle

*Check out my feature in Feedspot's Top 25 Houseplant Blogs!

Creeping Pilea Care

Creeping Pilea is part of the succulent family; however, their care differs slightly from the typical succulent. Creeping Pileas are trailing plants that can grow to be quite long with the correct care. Creeping Pilea can come in both green-leafed and red stem varieties. The care for the two color varieties is the same.
Creeping Pilea plant care and tips including water, light, soil, pot, pests, propagation, and more!
Red Stem Creeping Pilea
Water: Let the soil of your Creeping Pilea dry out between waterings. Do not let your soil get soggy or else your Creeping Pilea may develop root rot. If the stems and leaves on your plant start to droop, it needs more water. I water my Creeping Pilea once a week; however, in the winter, cut back on watering depending on how much light your plant is receiving. If you supplement your plant with grow lights during the winter, it will still needs to be watered about once a week.

You can buy the plant light I use and recommend from Amazon.

Light: Grow Creeping Pilea in bright indirect light. If you do not give your Creeping Pilea enough light, it will begin to get leggy. A sign of too much light is if your Creeping Pilea plant begins to get brown leaves. Adjust the light level for your Creeping Pilea until you find what spot works best in your home. I keep my Creeping Pile about 2 feet from my window. If you dislike the look of your plant leaning towards once side, rotate it once a week to keep it even. The leaves on Creeping Pilea like to face the light.
Creeping Pilea plant care and tips including water, light, soil, pot, pests, propagation, and more!
Creeping Pilea leaves turned towards the light
Soil: Creeping Pilea like well-draining soil. A succulent and cactus mix will help keep your plant from getting root rot. If you decide to use an all-purpose potting mix, it will work fine, but you have to be a little more careful with your watering.

Pot: Creeping Pilea like to be slightly root-bound. Keep them in smaller pots; however, if you notice your plant is starting to get root wrapped, it is time to repot. Repot your Creeping Pilea in only a slightly bigger pot.

Creeping Pilea plant care and tips including water, light, soil, pot, pests, propagation, and more!
Use a small pot for Creeping Pilea
Propagation: To propagate your Creeping Pilea

1. Take a cutting off of one of the stems. Try to take your cutting from an unnoticeable area because it may take a while for it to grow back.

2. Remove the leaves from the bottom of the cutting.

3. Put the cutting in a small container with dirt.

4. Water the cutting until it is significantly moist.

5. Place the cutting in a plastic bag to create a greenhouse environment.

6. Put your cutting under a grow light that is on for at least 12 hours a day

7. Wait until you see a sprout!

For more detailed information on propagation from cuttings, go to my post How to Propagate Plants from Cuttings

Pests: Check your plant for spider mites. Spider mites will rapidly kill your plant once they establish themselves. The best way to monitor your plant is to keep an eye out for any webbing or dropping leaves. To prevent spider mites, keep the humidity high around your plant.

Issues: Not enough light can cause your plant to get leggy and ugly. This can be especially a problem in winter when you do not have as much natural light. If you notice your plant is struggling, but you do not have a way to give it more light, consider buying a plant light. Too much light can burn the ends of your leaves causing them to turn brown.

Toxicity: Creeping Pilea plants are non-toxic to pets! If you have cats or dogs that like to nibble on your plants, the Creeping Pilea plant will not hurt them!

Creeping Pilea plant care and tips including water, light, soil, pot, pests, propagation, and more!
Red Stem Creeping Pilea
Creeping Pilea plants are an easy plant to grow! They do not require a lot of maintenance besides watering once a week!

Good Luck! 

Lily's Indoor Jungle

Pothos Devil's Ivy Care

Pothos Plant care tips including water, light, soil, issues, pests and propagation.
Hanging Pothos Plant
Pothos plants are a great low-light houseplant for beginners! These plants are well known for being almost un-killable. These plants can be grown in a hanging basket or on a table-top. Pothos come in multiple color varieties ranging from solid green to variegated. Although these plants are quite hardy, there are some care tips you need to follow to keep them look healthy!

Water: Water Pothos once a week when the soil is dry. If the leaves on your plant begin to droop, your plant needs more water. If you begin to get brown spots on the leaves of your Pothos, it is getting too much water. If you notice yellowing leaves on your plant, this could be either because of pests, or the roots of your plant are sitting in water. To fix this, make sure your pot has adequate drainage and inspect for pests.


Pothos plant care tips including water, soil, pot, issues, pests and propagation.
Brown Leaf Spots
Pothos plant care tips including water, soil, pot, issues, pests and propagation.
Slightly Drooping Leaves


Light: Pothos are low-light plants, but they can tolerate up to medium-light. If your Pothos plant is getting too much light, it will start to get brown tips.

Soil: A well-draining all-purpose potting mix works fine.

Pot: Pothos plants can be either potted as a hanging plant or in a regular pot. If you are going to hang your Pothos plant, make sure to use a plastic pot. Pothos plants can grow to be quite heavy. A plastic pot will help keep the weight lighter. Check your plant periodically to make sure your plant does not need to be repotted. Since Pothos are fast-growing, they can easily get root wrapped without you noticing.

Fertilizer: Fertilize your Pothos Plant once a year in the spring with an all-purpose slow-release fertilizer.

Propagation: Pothos plants are easy to propagate. Clip off a stem that has a couple of nodes then stick the stem in dirt. If you need to, pluck a couple of leaves off the base of the cutting. If your leaves are touching the dirt, they may rot. Place the plant under a plant light or in an area with a lot of sun. If you want to speed up the rooting process, you can place the cutting in a plastic bag to create a greenhouse environment.

Pothos plant care tips including water, soil, pot, issues, pests and propagation.
Cutting in Dirt
Pothos plant care tips including water, soil, pot, issues, pests and propagation.
Pothos Cutting


Pests: Pothos plants are prone to spider mites and mealybugs. Periodically check for them by inspecting the leaves and stems of your plant. To make it easier to see the spider mite webs, mist your plant with water. Signs of pest are yellowing leaves, leaf spots, webbing, and leaf dropping.

If you discover either of these pests:

1. Separate your plant from the rest of your collection.

2. Spray down your plant with water to remove the bugs.

3. Spray your plant with a mixture of vinegar, soap, water and baking soda. For the exact recipe, read my post on Spider Mite Help.

4. Spray your plant with neem oil.

5. Repeat the process until all the pests are gone.

Pothos plant care tips including water, soil, pot, issues, pests and propagation.
Make sure to check underneath stems.
Mealybugs like to hide in these areas.
Pothos plant care tips including water, soil, pot, issues, pests and propagation.
Variegated Pothos Plant
Pothos plant care tips including water, soil, pot, issues, pests and propagation.
Variegated Pathos Plant


Overall Pothos plants are a great houseplant to grow. With just a little care, they will grow into magnificent plants!

Good Luck!

Lily's Indoor Jungle

Ponytail Palm Care

Ponytail Palm care and tips including light, water, soil, pot, pests, issues, poison, and more!
Ponytail Palm
Ponytail Palms have become popular succulent to grow indoors. These succulents are slow growing; however, they can become quite large and impressive! The name Ponytail Palm comes from how their green leaves resemble a ponytail!

Water: Ponytail Palms are drought tolerant and do not like a lot of water. Water your Ponytail Palm no more than once a week. I recommend watering Ponytail Palms every week in a half except during the winter, water once a month. Overwatering can easily kill a Ponytail Palm. However, if your Ponytail Palm is getting brown tips, it may be a sign of not enough water.

Light: Give Ponytail Palms as much light as you can. Put them as close to a window as you can.

Ponytail Palm care and tips including light, water, soil, pot, pests, issues, poison, and more!
The Base of a Ponytail Palm

Soil: Ponytail Palms need a fast-draining potting mix. Cactus and Succulent potting mixes from the store work great. To improve drainage to help keep your Ponytail Palm from getting overwatered, add a little Perlite to your soil.

Pot: Use a terracotta pot to help prevent overwatering. Terracotta pots allow the soil to breathe in the pot as opposed to a ceramic pot. Use a pot that has about an inch distance from the rim of the pot to the base of the Ponytail Palm. If your Ponytail Palm outgrows the inch distance, it is time to repot. Keeping your Ponytail Palm in a small pot will not harm the plant, but it will stunt its growth. If you are looking for your Ponytail Palm to grow bigger, make sure your pot allows for growth.

Fertilizer: Use a slow-release cactus and succulent fertilizer once a year in the spring.

Pests: Ponytail Palms are prone to getting spider mites. If you notice webbing on the leaves of your Ponytail Palm, move your Ponytail Palm away from the rest of your plants, Then, remove the webs with a wet washcloth. Spray your Ponytail Palm with a mixture of half rubbing alcohol and half water. Repeat these steps once a week until the spider mites are gone.

Issues: If your Ponytail Palm begins to get brown tips, it may be a sign of under-watering. Increase the frequency that you water your succulent; however, never water more than once a week. Another cause of brown tips may be overfertilizing. If you think this may be the cause, remove some of your slow-release fertilizer pellets and make make sure to follow the directions on the fertilizer bottle.

Poison: Ponytail Palms are not poisonous to cats and dogs! Do not worry too much if you catch your pet chewing on the leaves, this plant is non-toxic!

If you notice the bottom leaves of your Ponytail Palm are turning brown and dying, this is normal. This happens as the Ponytail Palm grows and puts off new leaves. Once the leave is completely brown and dry, pull or cut it off.

Ponytail Palm care and tips including light, water, soil, pot, pests, issues, poison, and more!
Top of Ponytail Palm

Ponytail Palm care and tips including light, water, soil, pot, pests, issues, poison, and more!
Ponytail Palm

Ponytail Palms are an easy houseplant to grow! These plants thrive on neglect so don't worry if you are a plant killer! The main secret to keeping these plants alive and growing is to not overwater. As long as you never water more than once a week, you should be fine. These plants have a dramatic appearance with their wide-spreading leaves, so they make a great plant to decorate any space!

Good Luck!

Lily's Indoor Jungle


Wandering Jew Care

Wandering Jew houseplant care including water, light, soil, pot, pests, poison, propagation, and more!
Wandering Jew Plant
Even if you haven't heard of their name before, you probably recognize the brilliant purple leaves of the Wandering Jew plant. The purple and green leaves of these plants look like they could have been painted on. These wonderful plants can add a pop of color into any household!

Water: Wandering Jew plants like to stay moderately moist, but not soaking wet. Watering your plant twice a week is best. If you notice that the leaves on your Wandering Jew plant seem to be drooping, it needs more water.

Light: Wandering Jews need bright light. You should put them as close to a window as you can. If you notice that your plant is not growing very fast, it is not getting enough light. Wandering Jew plants are typically very fast growing. If you notice browning on the tips of your leaves, it is getting too much light.
Wandering Jew houseplant care including water, light, soil, pot, pests, poison, propagation, and more!
Hanging Wandering Jew

Soil: Regular, all-purpose potting mix works fine.

Pot: Plastic, terracotta, or ceramic pots all work fine. Wandering Jew can be grown as a hanging plant as well as just a regular plant. If you want to grow it as a hanging pot, I would recommend using a plastic pot. Wandering Jew plants can get quite large and heavy. The plastic pot will reduce the weight strain on your ceiling or post. Also, check the bottom of your pots frequently to check for roots coming out the bottom. Since Wandering Jew plants are fast-growing, you need to make sure they do not outgrow their pots.

Propagation: Wandering Jew plants can be propagated by cuttings. Cut off a branch that has several nodes (or spots with leaves). Cut off a branch in an unnoticeable spot because it may take a while for new growth to start where you cut the plant off. Take the leaves off the bottom of the cutting then stick it in dirt and water. Propagation will be more successful if you put the cutting in a plastic bag to create a greenhouse environment and then place it under a grow light. Grow lights work better for propagation rather than the regular sun because you can adjust how long they are on. For my cuttings, I keep my grow light on for 12+ hours a day. You can buy the grow light I use from Amazon.

Fertilizer: Wandering Jew plants do not need a ton of fertilization. Use an all-purpose slow-release houseplant fertilizer once a year during the spring.

Poison: Wandering Jew plants are poisonous so keep them out of reach of pets and young children.

Pests: Wandering Jews are prone to spider mites and mealybugs. To prevent these pests, spray your plant with neem oil once a month, keep your plant well watered, and keep the humidity around your Wandering Jew high. You can create humidity for your plant by placing a tray of wet pebbles underneath your plant or spritzing your plant with water daily.


Wandering Jew houseplant care including water, light, soil, pot, pests, poison, propagation, and more!
Purple Wandering Jew
Wandering Jew houseplant care including water, light, soil, pot, pests, poison, propagation, and more!
Hanging Purple Wandering Jew


As long as you give your Wandering Jew plant enough sunlight and water, they will thrive in any household. There are many different color varieties of Wandering Jew including the purple I have, pink, and green!

Good Luck!

Lily's Indoor Jungle